Checklist for choosing an automatic chocolate tempering machine.
Tags:
Checklist for choosing an automatic chocolate tempering machine
In this article we won’t talk about how cool an automatic tempering machine is — we’ll talk about how to choose THE RIGHT ONE among all the cool machines.
All ATMs have one main function — dissolving (melting), heating, tempering and pouring chocolate, so if there is no experience with these machines, then it’s difficult to find out which one is better and even more so to choose the best one. Everything is like cars. For example, let's take several premium cars in the same price category: the cost is the same and they all look amazing. To a passenger or driver who is not used to such good cars and doesn’t understand the technical features they’ll seem equally cool. And since money allows, after a test drive you’ll want to buy the one that is subjectively best for you: engine sound, noise insulation, acceleration from 0 to 100, headlight design, interior color and so on and so forth. But to understand how successful the purchase was in fact is possible only while driving, when the delight and euphoria disappear. The moment of sobering up comes when you come to a car service for repair (if the case is out of warranty).
Similar with autotempers for chocolate: there are Italian, American, Russian, Chinese machines — each manufacturer has its own flagship models. They are all in the same price range and all do the same thing. If you are not used to overspending and are not ready to make a choice based only on the color of the buttons, the logo and the body, then you will definitely want to figure out what makes a good ATM really good, what you need to consider when choosing, so as not to know the hassle while working or maintaining. If this is you, dear reader, then this article is exactly what you need right now!
We are a school of professional chocolatiers, so tempering machines require a little understanding. During our activity we had 3 different ATMs (at the time of posting the article — August 2022), which we have explored far and wide. Here we’ll go through the topics that we consider the most important when choosing the perfect automatic tempering machine, starting with the external elements and ending with the internals, explaining in detail how everything works.
Let’s ride!

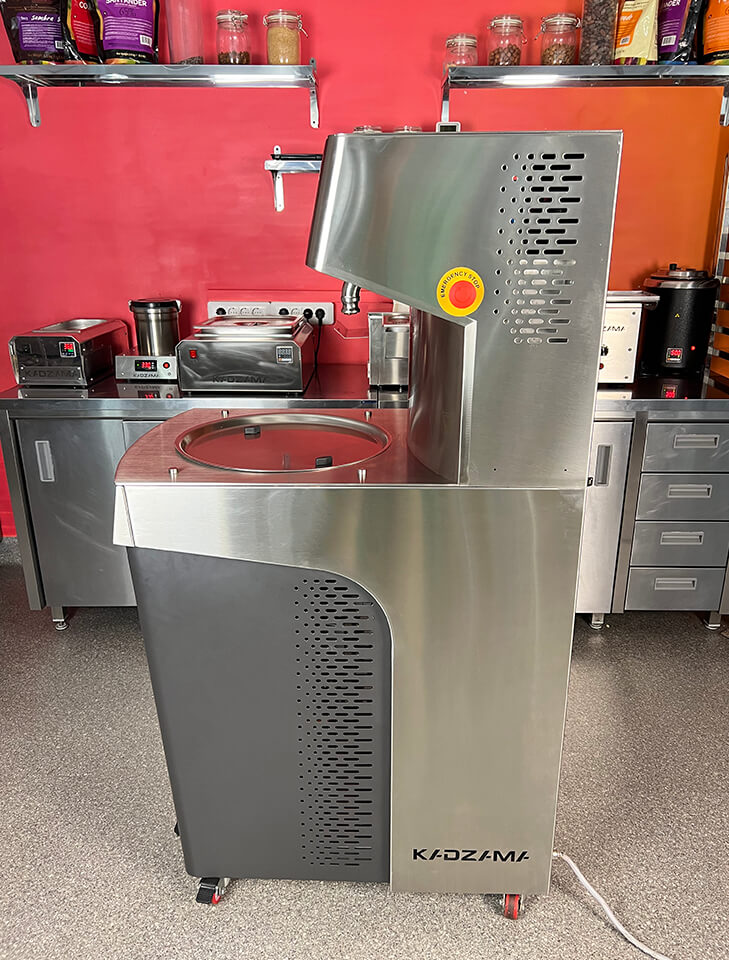
Let's start with the thing that catches your eye most — external look. Since the cyberpunk genre has come back into vogue, there’ve been many more fans of futuristic style around the world. And if for a gaming PC it’s okay to have such a futuristic take on a design, the need to make a similar look for manufacturing equipment raises doubts, since in these cases functionality suffers for the sake of design, which can become noticeable in work.
![]()
For example, an ATM has a special lid that closes the chocolate tank at the end of the shift to prevent external objects from getting in. When it’s used for its intended purpose everything is fine, but during the shift, when the tank needs to be opened, where should it be kept? Occupy some useful work surfaces or stack trolleys? The first thing you want to do is to put it on top of the machine which is quite logical — this way you will save precious workspace and you will always know where it is (or someone else will find it there after you without any problems). In order for this to be possible the top surface of the machine must be flat, not weird and curvy. And it's not just about the lid. You can put molds there while making chocolate bars, so they will always be at hand, which is also incredibly convenient: put them in a stack and work like a conveyor.
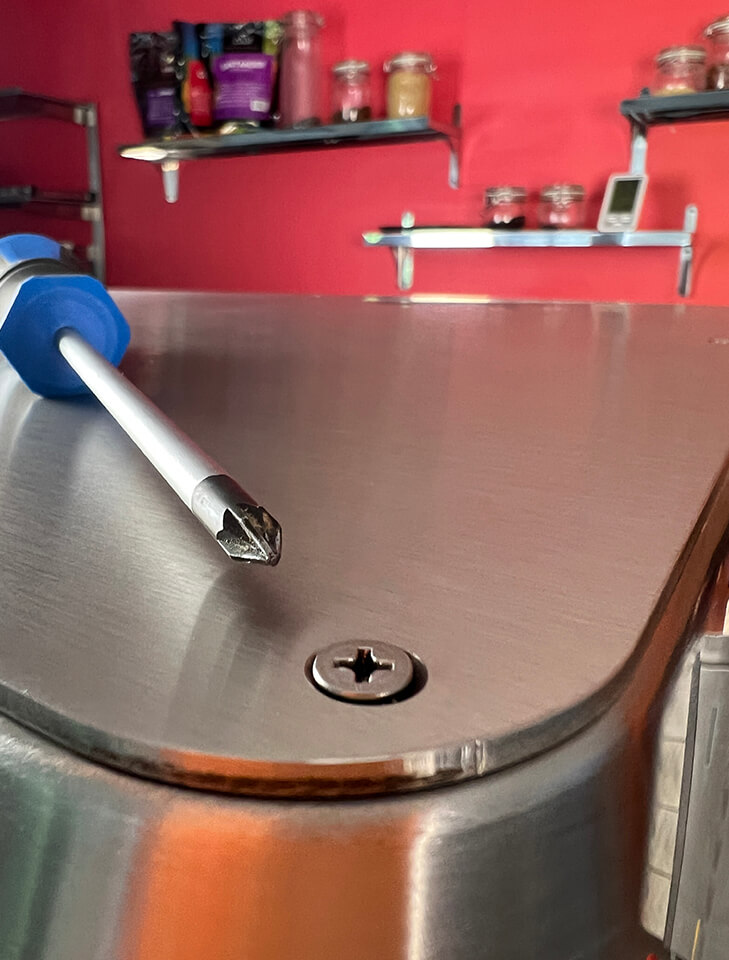
BTW, the way the top surface is attached is also important. It happens when you need access to the nodes and units under it. For example, to get the auger and clean it. If the cover is fixed with a large number of screws, then you will need to remove it for a long time, so we advise you to choose an option where they're not so many screws that you could unscrew with a regular Phillips screwdriver.

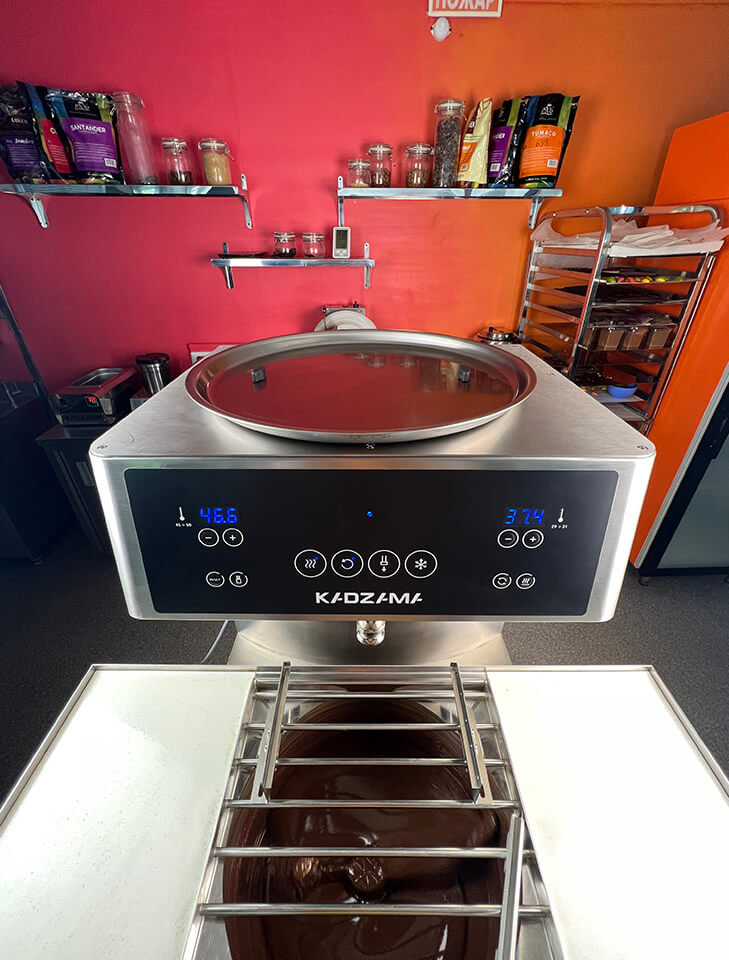
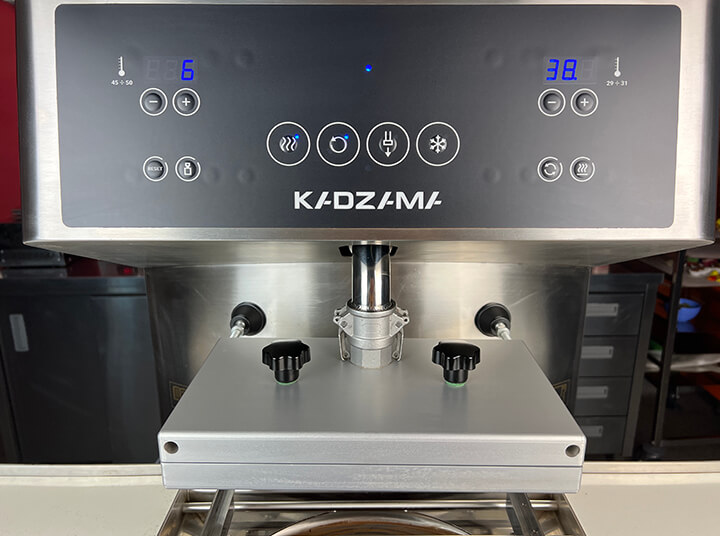
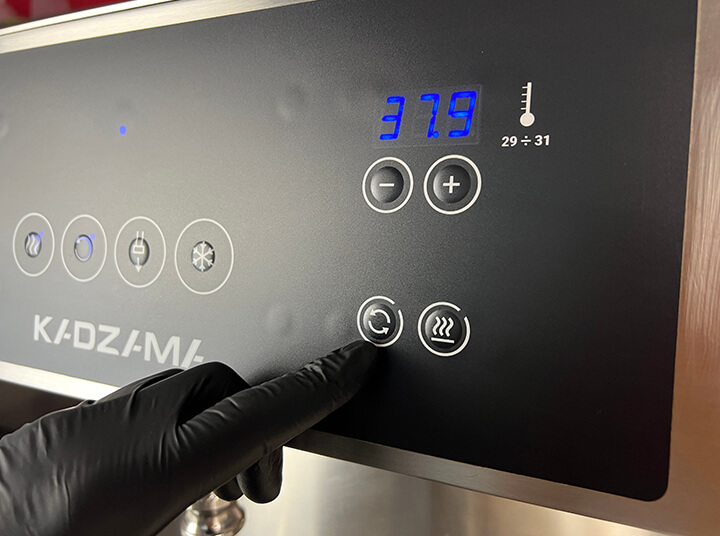
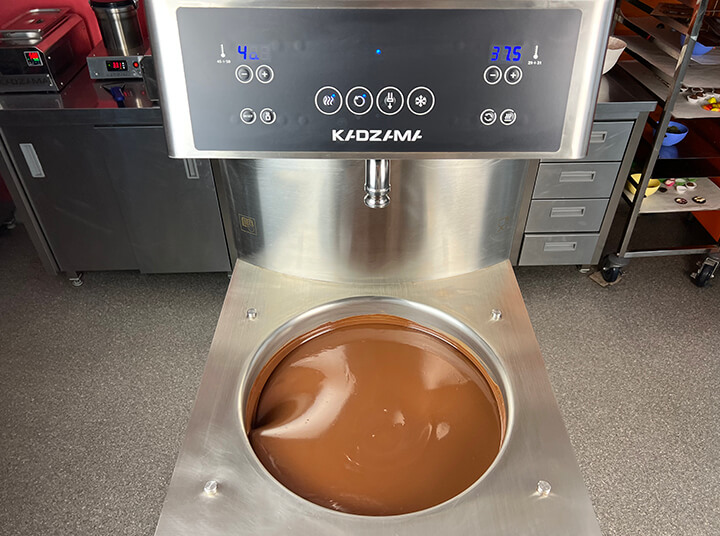
It can be at any place, but you better choose the panel, which is located on the top of the automatic tempering machine, since the panel that located below has a high chance of pollution: if the chocolate has overflowed and hit the panel, then at best — it's messy and ugly, and at worst — the chocolate will clog into the electronic components and cause them to fail. So positioning the panel above the drain spout will help keep it clean and avoid breakage. Chocolate can't fly yet.
It’s also worth paying attention to the functionality of the panel. The mandatory set of functions is as follows: turning on the melting tank, stirring the chocolate in the tank, pouring chocolate from the spout and starting tempering (turning on the compressor). It’s better when two temperature indicators are displayed: the temperature of the chocolate in the tank and the temperature of the chocolate at the outlet of the spout. Some tempering machines also have additional features such as interval chocolate dosing, which (obviously) allows you to set the dose of chocolate you want.
* Tempering machines don’t dose by weight, but by the auger’s work time, meaning that at different viscosities with different masses a different amount will always be given out, so there’ll be an error. On small volumes (20-25 g) the error can be 2-5 g, which is quite critical. If you need a more precise setting, then we recommend getting a special dispensing device like a precise chocolate dispenser.


The drain spout is one of the most important parts of an ATM, so there is also something to pay attention to.
Let's start with the ability to connect various gadgets and attachments to it. One of the most popular mounts for connecting various stuff to an ATM is the so-called camlock. If the spout is compatible with camlock you can quickly connect various gadgets to the ATM, for example, chocolate enrobing machine, precise chocolate dispenser or dispensing plate.
Next — drain spout material. If it’s colored, then keep in mind that the paint will eventually begin to chip off and fall into the chocolate, so it will need to be caught, otherwise it will fall into the product, and then it will get into the mouth of the client (perhaps a child). To avoid this, choose the usual unpainted stainless steel — you can't go wrong with it.
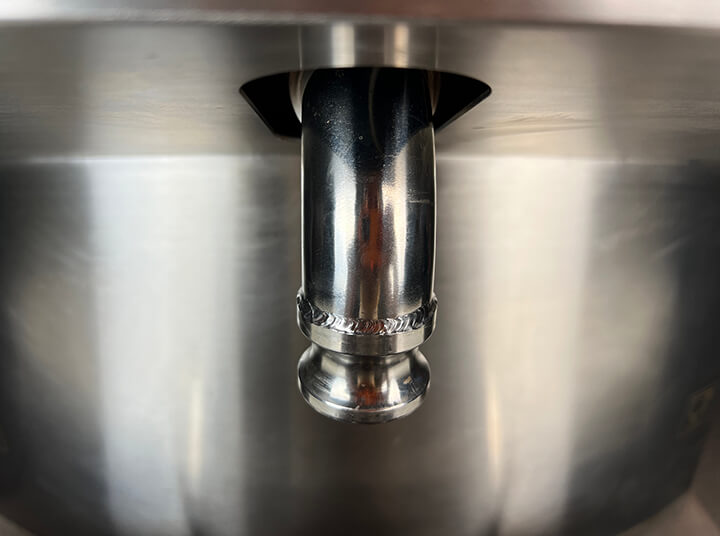
Now let's look deeper and find a temperature sensor that indicates the temperature of the chocolate at the exit. The closer it is to the drain, the more accurate the output temperature will be. If it’s located deep and the nozzle is long, there can be no question of any accuracy of indicators. The additional heating of the spout is also great as the machine will be able to accurately maintain chocolate temperature.
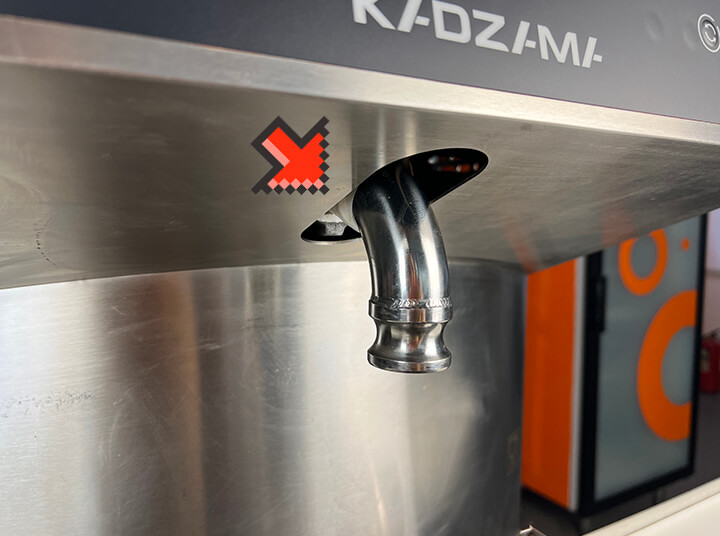

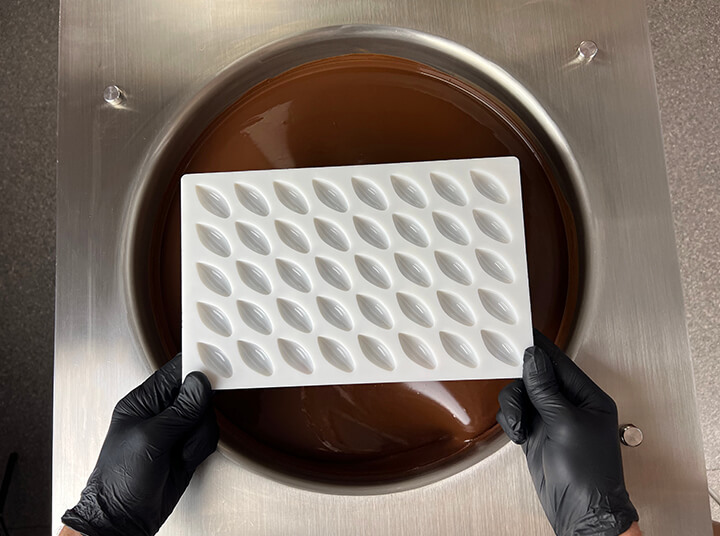
Another important, but not extremely obvious detail is the distance between the drain spout and the back wall. If the back wall is too close to the spout, it will be more difficult to fill the entire mold with chocolate — you will have to rotate the mold at different angles. So we recommend choosing a machine where this distance is sufficient for comfortable placement of the mold and pouring.

You will be surprised, but not all manufacturers are ready to offer you a vibrating table as standard, so having it out of the box is a huge advantage. What are we looking at next? First of all, pay attention to the possibility of installing the vibrating table by one person without additional tools, complex fixtures and other mechanisms. Like that joke: how many chocolatiers do you need to connect a vibrating table to an ATM?
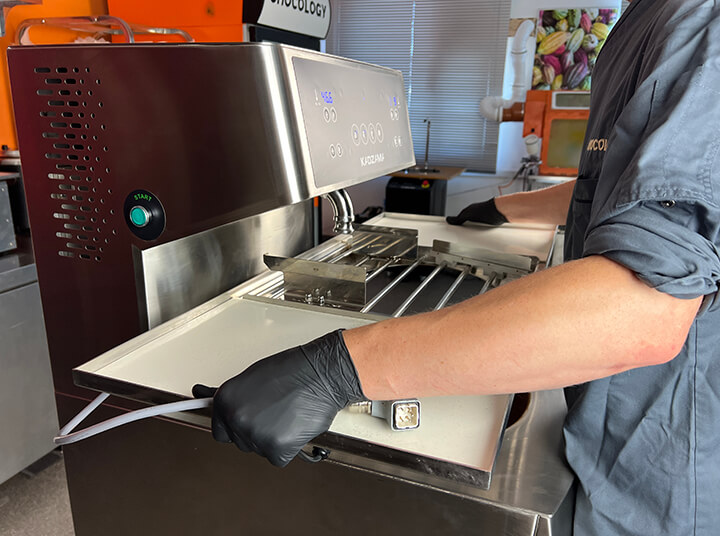
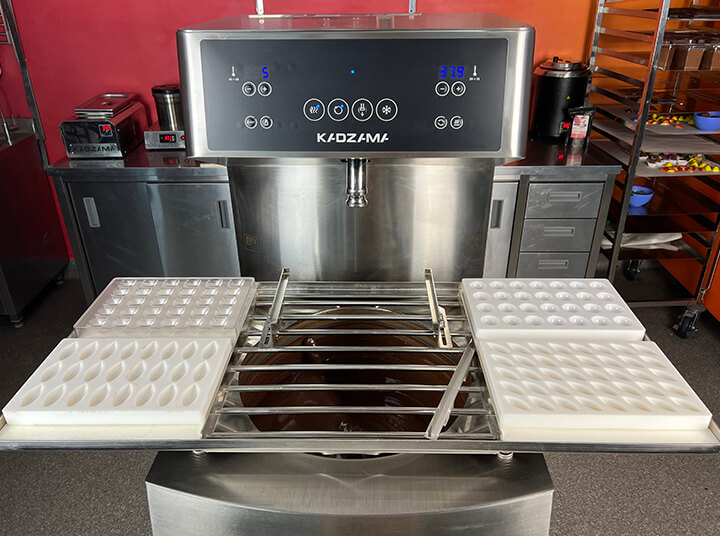
The size of the vibrating table matters. The larger it is — the obviously more molds can be placed on it. The cleaning scraper-knife is a small, but important detail. If there is one it’s great: fill a mold, knock out chocolate from it and immediately scrap off the excess chocolate with this scraper without having to reach for a spatula.
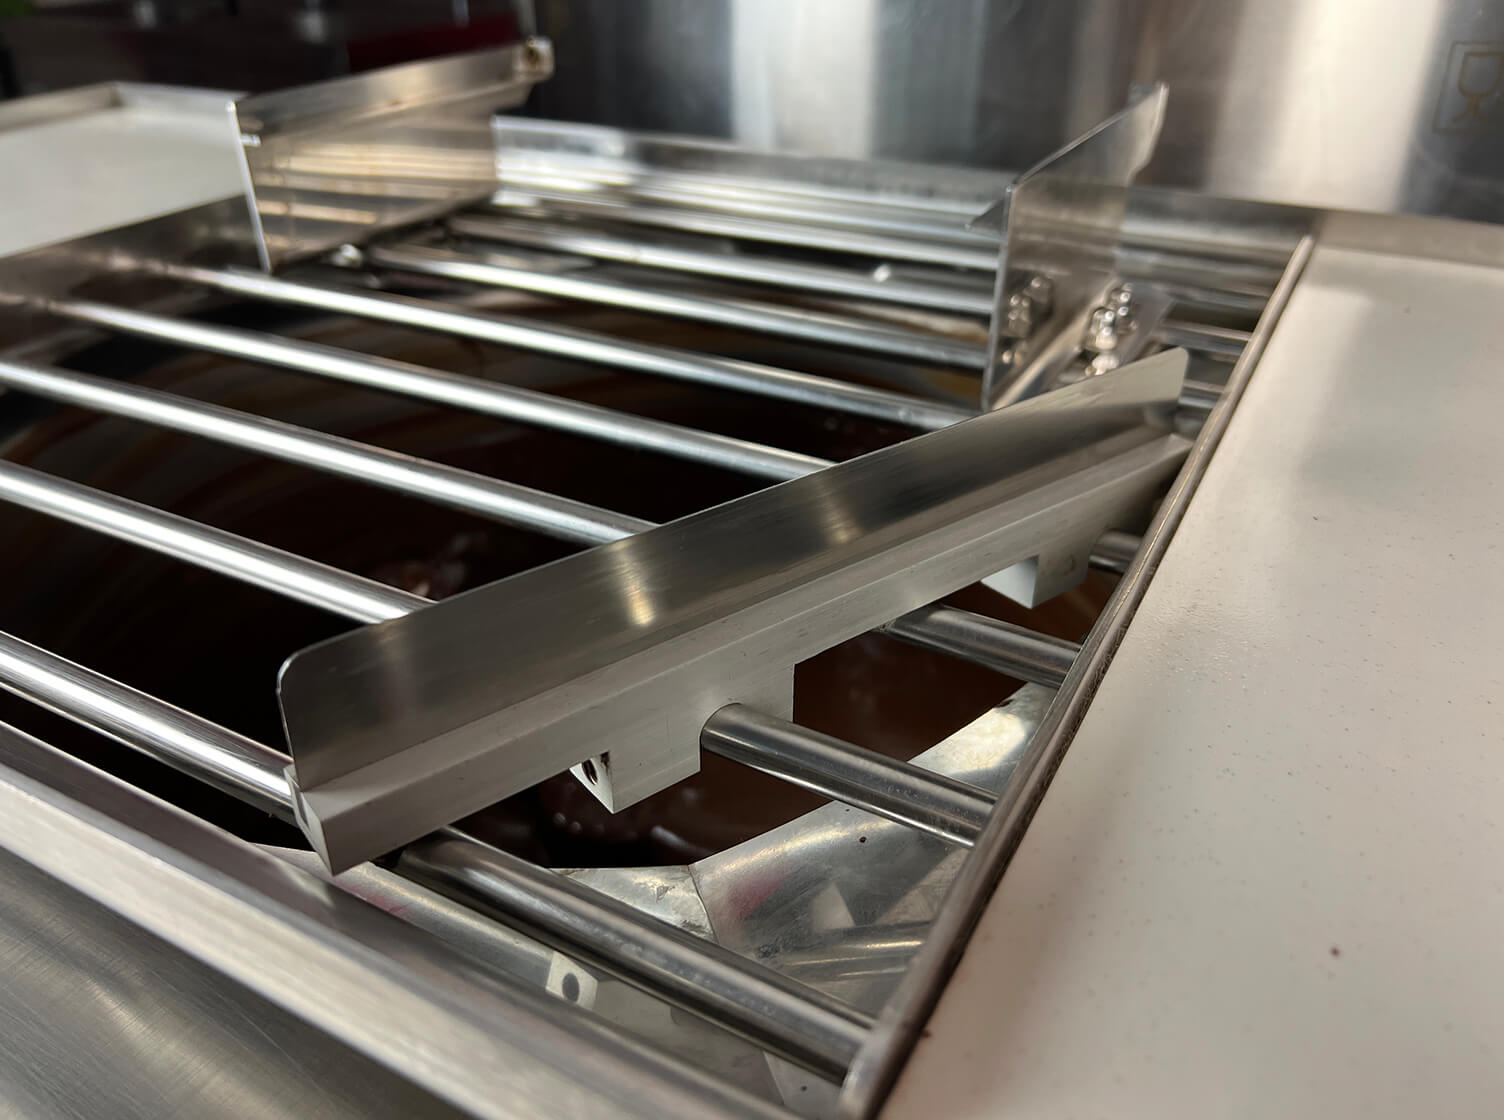
Connection of the vibrating table directly to the ATM is an important functionality. Firstly, you don’t need to have an additional free socket somewhere nearby, and secondly, the vibrating table can be controlled directly from the autotemper panel. We also advise you to pay attention to the vibrating table bars heating — not the most significant detail, but if they’re heated, then the chocolate will not harden on them.

The next external detail on the agenda is the loading tank. It can be any size: 5 kg or 100 kg, doesn’t matter. Listen: the larger the volume, the more convenient it is to work continuously with the machine. We advise you to take a closer look at the machines whose tank volume starts from 30 kg of loading. Why? If the tank, for example, is 30 kg, then you can easily make 15 kg without any changes in temperature parameters. If the volume of the tank is small and you need more chocolate, then you will take it from the bottom, which means that in some places its temperature will be higher, in some lower, so the temperature curve is broken. If you are using a 10 kg ATM, then you cannot use all the ten, because some chocolate must remain in the tank to maintain the temperature. For continuous working, warm chocolate is usually gradually added to the ATM, so if out of 10 kg only 3 kg is left in the tank then adding another 3 kg may change the temperature and you will need to wait until the added chocolate pre-crystallizes. With 15 kg in the tank you can gradually add 3-5 kg of warm chocolate from a wheeled chocolate molding machine kit without fear of a temperature change, since there is enough chocolate inside to equalize the overall mass temperature.
Another topic worth paying attention to is the diameter of the tank. It's the same here — the more the better. Moreover, the tank volume and the diameter of its «muzzle» do not depend on each other and there are tempering machines with a rather voluminous, but very narrow tank. Why is it important? When getting rid of excess chocolate from the mold it falls exactly into the tank and not onto the machine body, floor or your legs.
The pedal allows you to: A — stop the chocolate flow, B — in the case of the dosing mode, when you press and hold (the pedal) automatic dosing happens. The first thing you should pay attention to is the material of the pedal. Choose metal, because pedals are often made of plastic which is undeniably inferior to metal in terms of durability. It’s also necessary to pay attention to how easily the pedal is disassembled, because it’s quite possible for chocolate to get on it. Once inside, the chocolate will harden and the pedal will need to be cleaned. So the easier it is to disassemble the better.

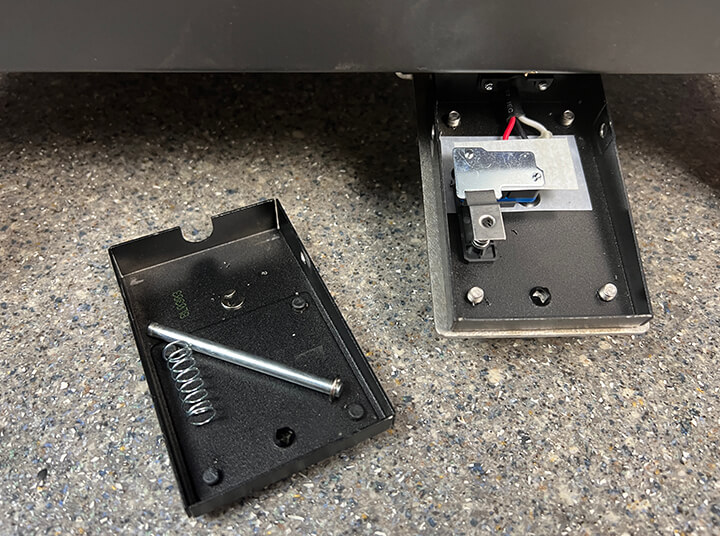
You can also notice that in some ATMs the pedal is located not clearly by the center, but slightly to the right. This is not a bug, but a feature. The pedal by the center is beautiful looking, but not very convenient to use, because we don’t have a foot by the center. Such a pedal location by one of the sides (almost always to the right) is due to the fact that it’s simply more convenient for the operator, when you have to work a whole shift.
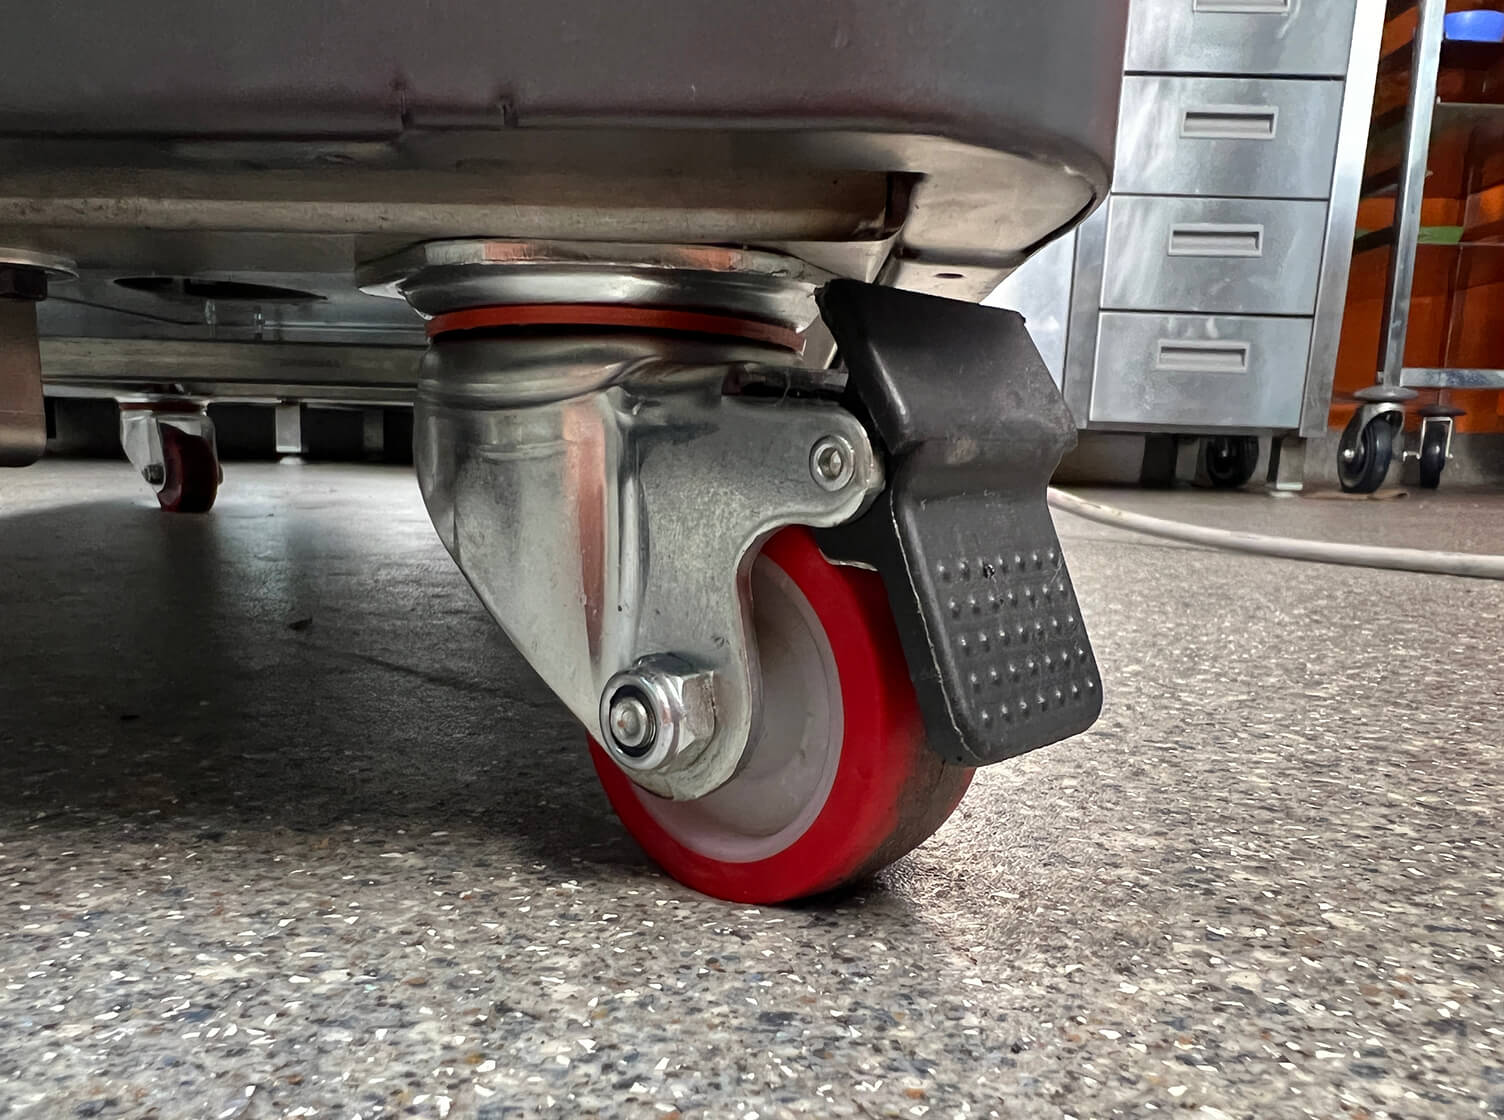
Almost all ATMs have them in order to easily move the machine around the workshop. But even here there are nuances. The first is the ability to adjust the wheels by height. Sometimes there is a differently inclined floor, which creates additional difficulties for the equipment installation. In order for the machine to be clearly on the horizon, so the flow of chocolate does not shift, it’s necessary to be able to calibrate each individual wheel.
The second point is docking with other pieces of equipment. If the wheels can be unscrewed and replaced with others with a different diameter it’s nice. Having picked up new wheels of the required diameter, you can change the height level of the melting tank of the machine and dock it with other equipment you need.
And the last point — locks. They will allow you to fix the ATM so it doesn’t move. For example, docking with another piece of equipment — a cooling tunnel.
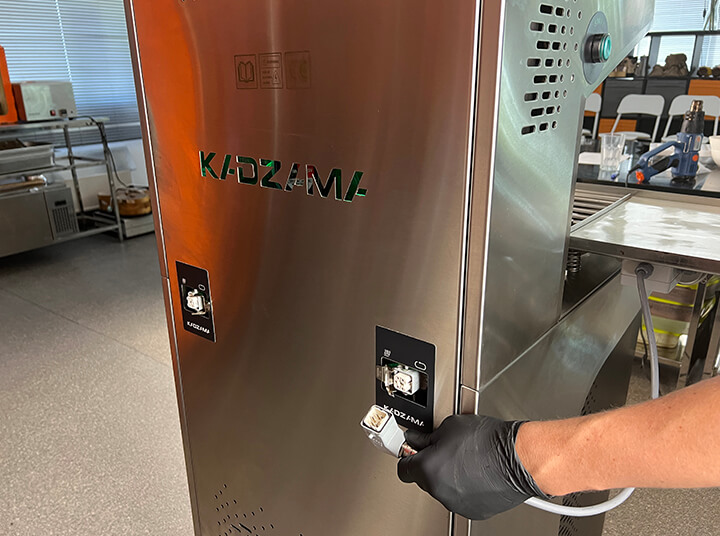
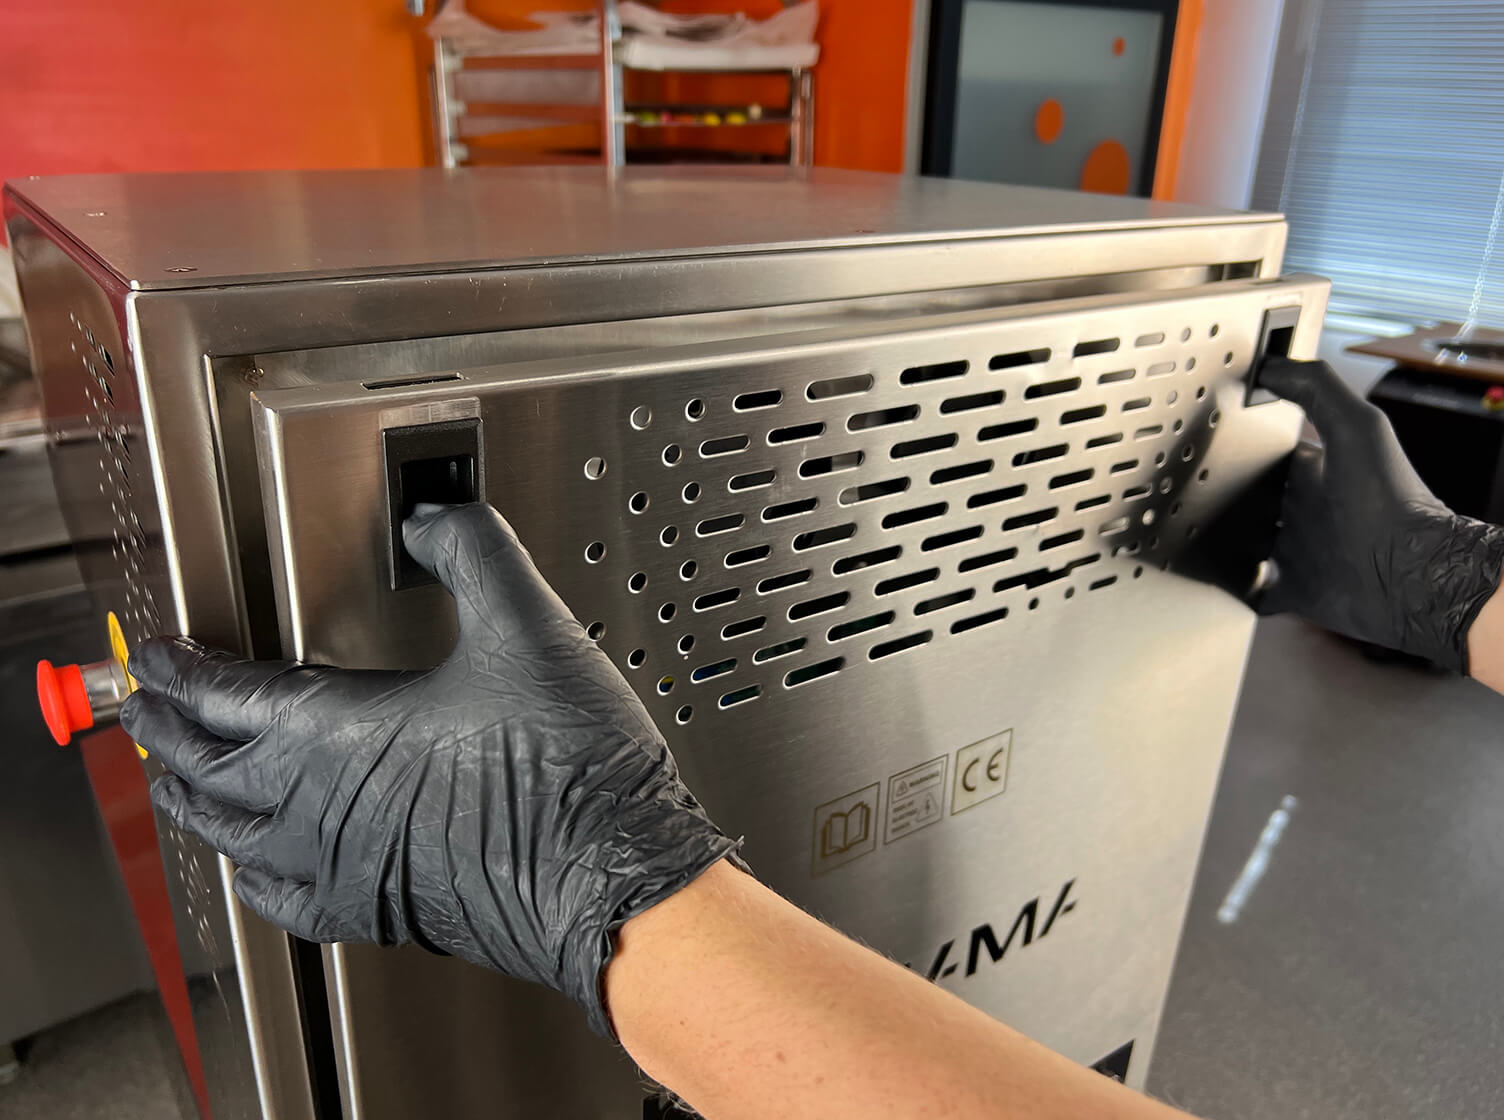
We're done with the external features to look out for, so we're off to the ATM’s inner world. Even if the ATM is working properly, it needs to be serviced from time to time: for example, removing dust and dirt from the cooling radiator. What is needed for this? Removing the panel, of course. Let's start with the back cover, since almost always it closes access to the electrics and the main components. If it’s fastened with a huge number of screws it’s bad: it has to be unscrewed for a long time and carefully stored so as not to be lost. Frequent loosening and tightening of screws wears out the threads, so we believe that the best option are special locks with latches like our ATM has.
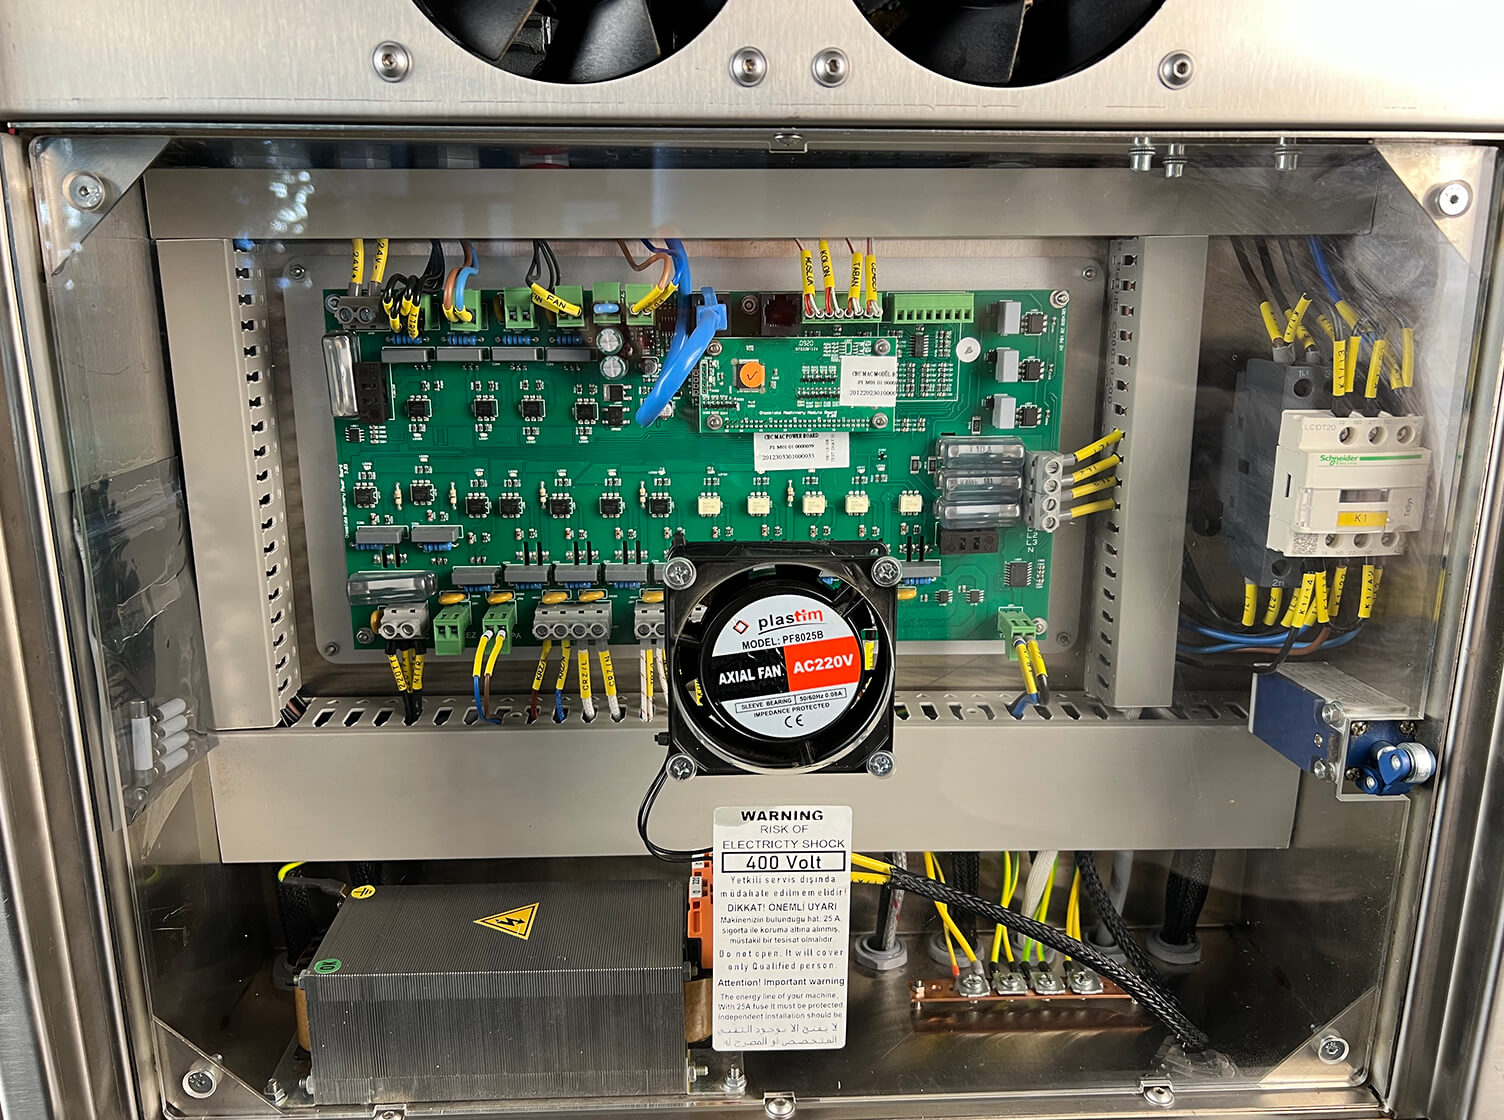
Finally, we're inside. Let's start entertaining ATMology with the motherboard. No rare parts and chips on the board is a positive sign which means that a person even with the competencies of an ordinary technician will be able to fix it via buying parts from a radio store around the corner. In the case of a breakdown of a complex unique board, you will have to buy spare parts directly from the manufacturer. It’s not cheap and even when money is not a problem, there is still logistics, due to which, you will have to wait for spare parts for an unpredictably long time if the manufacturer is foreign.

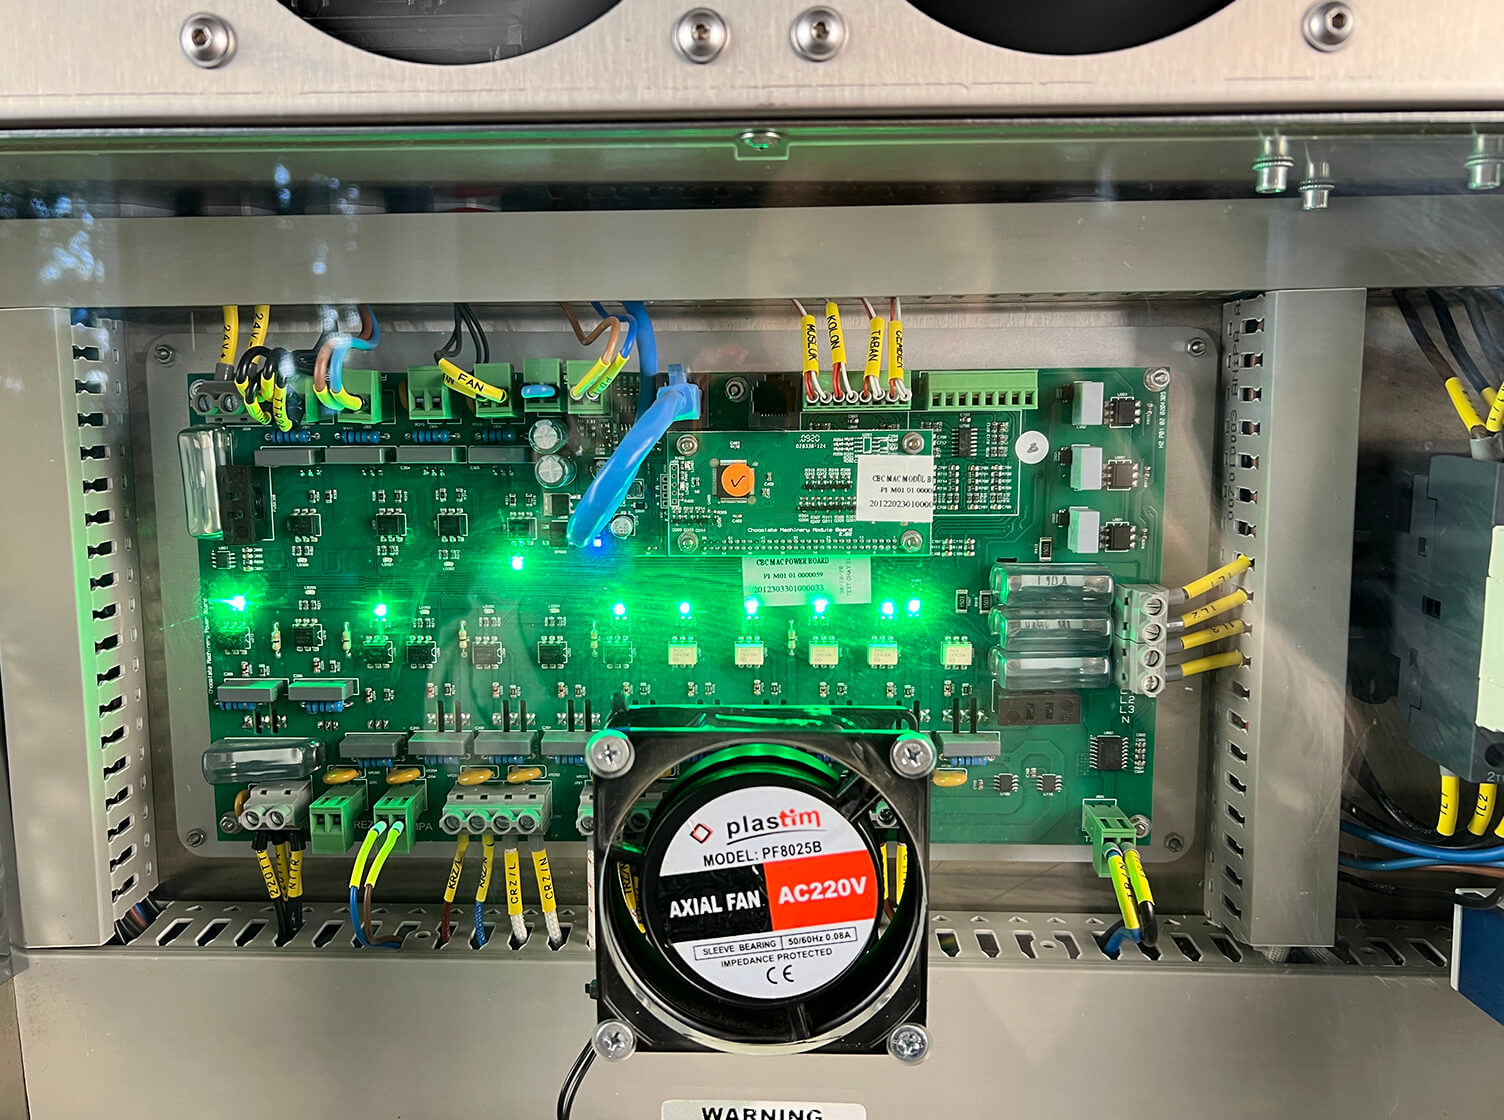
Having a simple and working self-diagnosis is cool. Not even every modern PC has it. How it works on the example of our ATM by KADZAMA: you turn on the tempering machine, start each of the functions step by step and see how the LEDs on the board light up and start flashing, indicating to you that the function being checked and all its elements are working properly. If something is not working, you will see a red light. The self-diagnosis function will allow you to determine the cause of the malfunction even remotely via video call to a service center.
No one considers this point serious until they begin to work with the machine and encounter its maintenance. It’s similar here: the more ergonomic and freer the internal nodes are placed, the easier it is to clean them from dirt and dust. The engineering charms don't end here.
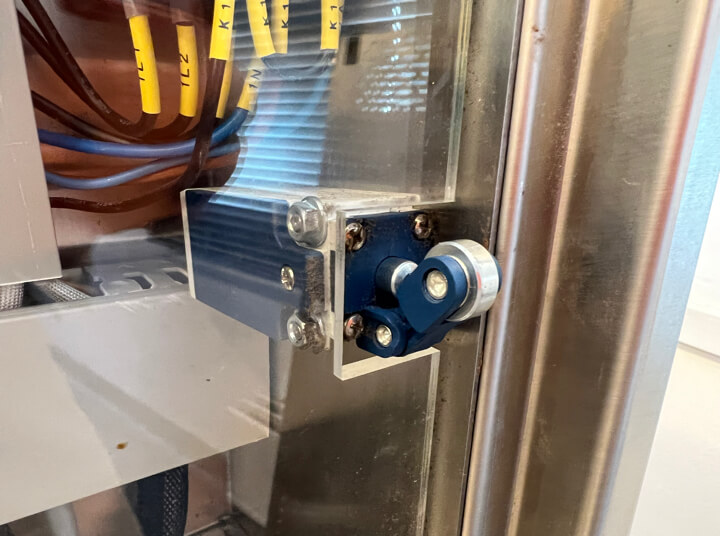
There is a limit switch to the right of the already familiar board. Not all the ATMs have one, but at the same time it’s a very important detail that directly affects safety during repair/diagnostic work or simply when opening the back cover. Now let's explain. The limit switch is an indispensable thing in the operation of many electrical appliances and mechanisms. It works simply: when a certain type of signal is applied, the limit switches start the movement of an element or limit it. In the case of an ATM they turn off the voltage when there is a mechanical impact. The limit switch completely de-energizes the ATM when the user tries to get to the mechanisms and electronic components behind the back cover so that it does not get electrocuted.
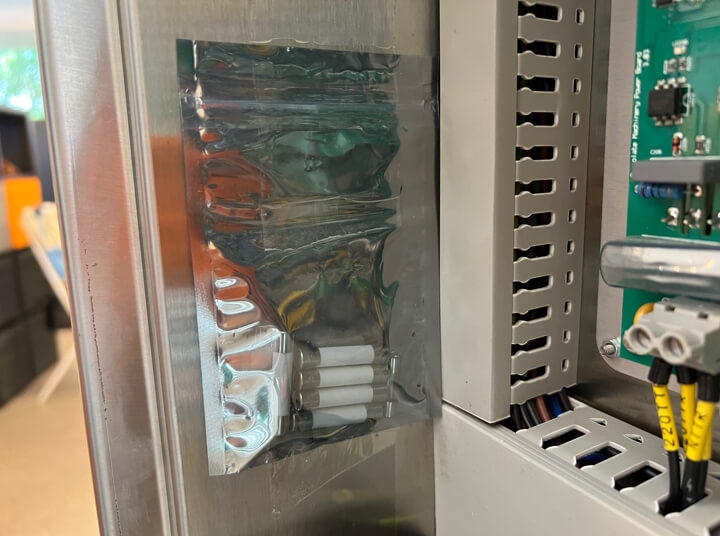
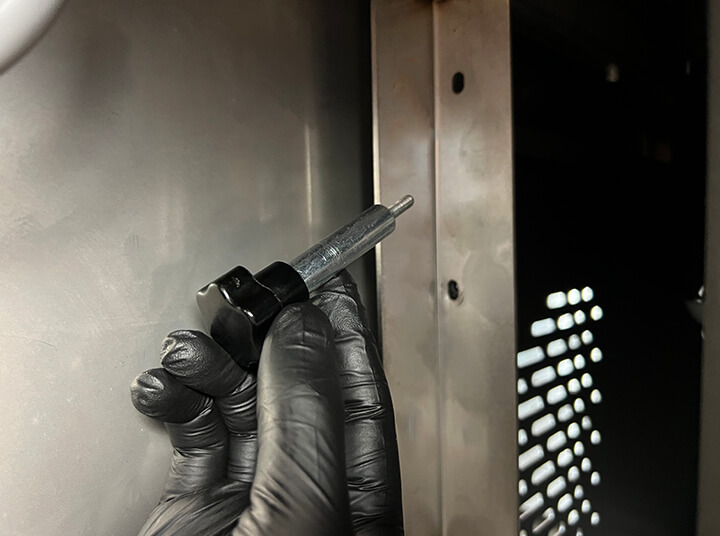
To the left of the board hangs a bag of spare fuses. Remember that feeling, when you bought a new shirt and there were spare buttons attached to the tag inside? It's the same here — you don't have to think about where to get it, when you need to replace them in case of failure. Just don’t forget to understand the cause of the burnout first.
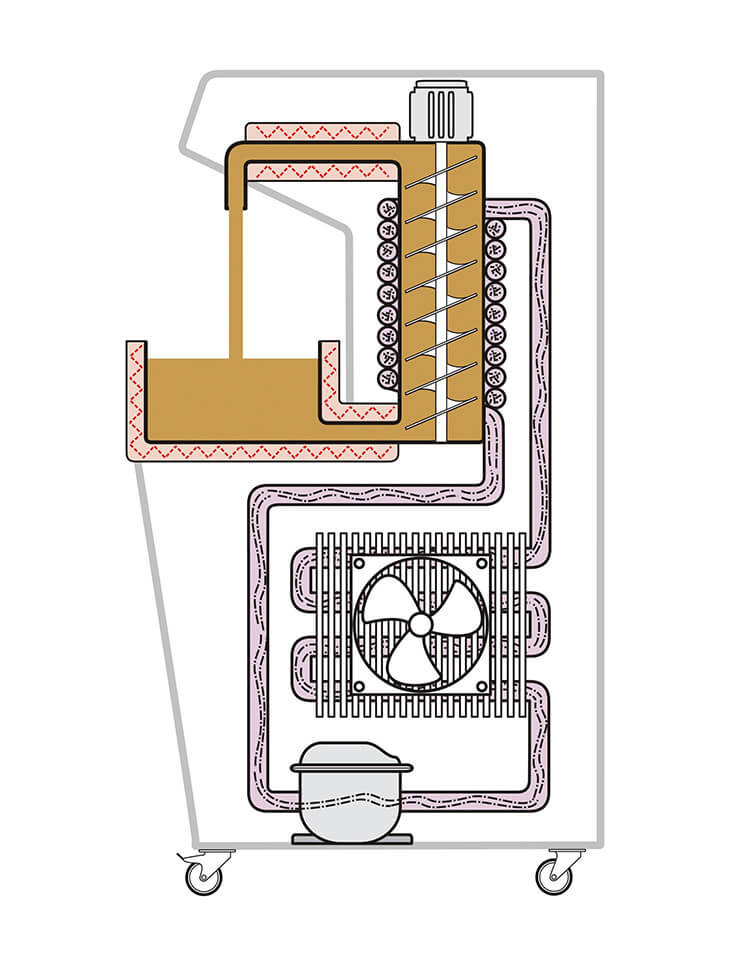
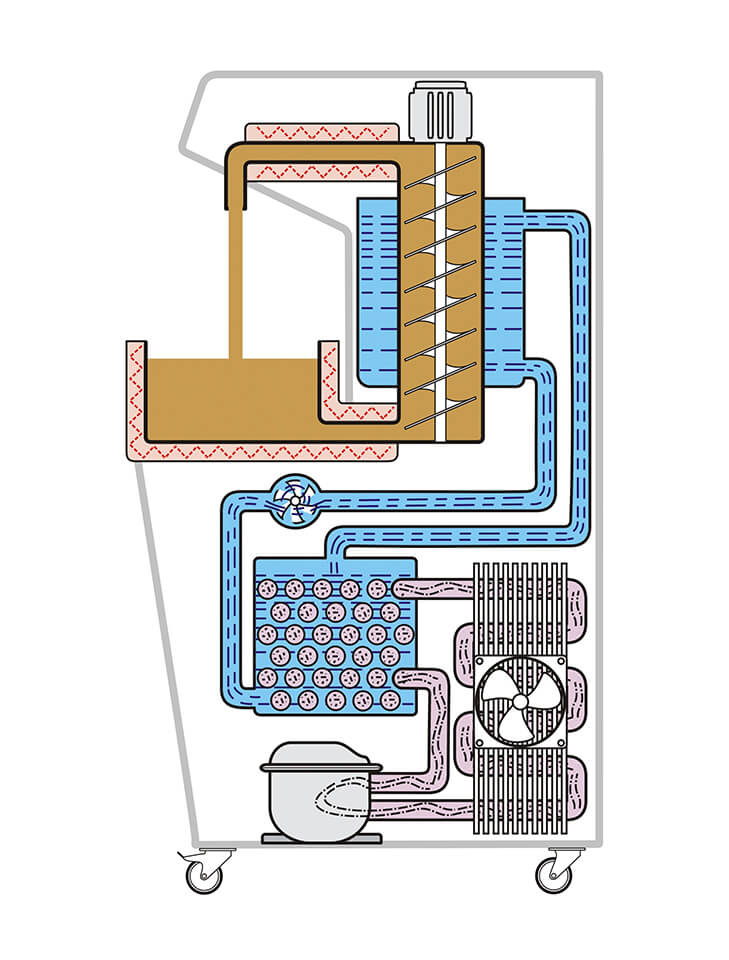
Now let's take a look at the auger’s cooling principle. There can be two options. The first is a copper capillary tube around a chocolate supply column. The scheme is quite working, but, in our opinion, not the most efficient, because the winding has a circular cross section, which means that the contact area of such a winding with the pipe wall is so small, the cold is not transferred as well as it could. We consider the second method of cooling to be more effective — water. In this case the compressor first cools the liquid, which is then transferred to the cooling column for better cooling. Such tempering machines last longer and cool the chocolate in the column more efficiently.
Water cooling also has its own nuances. You need to pay attention to how the coolant pipes fit into the supply post. The threaded connection of the pipes is worse, since the thread will loosen over time from vibrations, which will lead to leakage of liquid, and, as a result, to the worse quality of tempering. Therefore, if you take a water-cooled machine, we advise you to choose one with quick-release swivel fittings — such mechanisms do not unwind and loosen, which means that liquid leakage over time is simply impossible. You will suffer less.


Being mentioned so many times over the article and now, finally, has its own topic. What can be said here? We don’t recommend a plastic auger in any case, as over time it can crack and plastic bits will get into the chocolate. If the ATM operator doesn’t notice this, then consumers will certainly do. And the plastic auger wears out faster while working with a rough mass. We recommend metal — stainless steel — it’s safer and lasts a hundred times longer, besides it doesn’t have any smell.


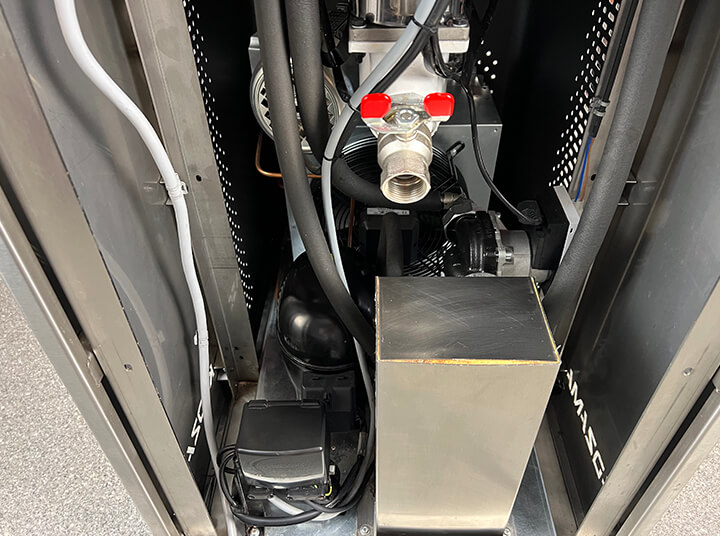
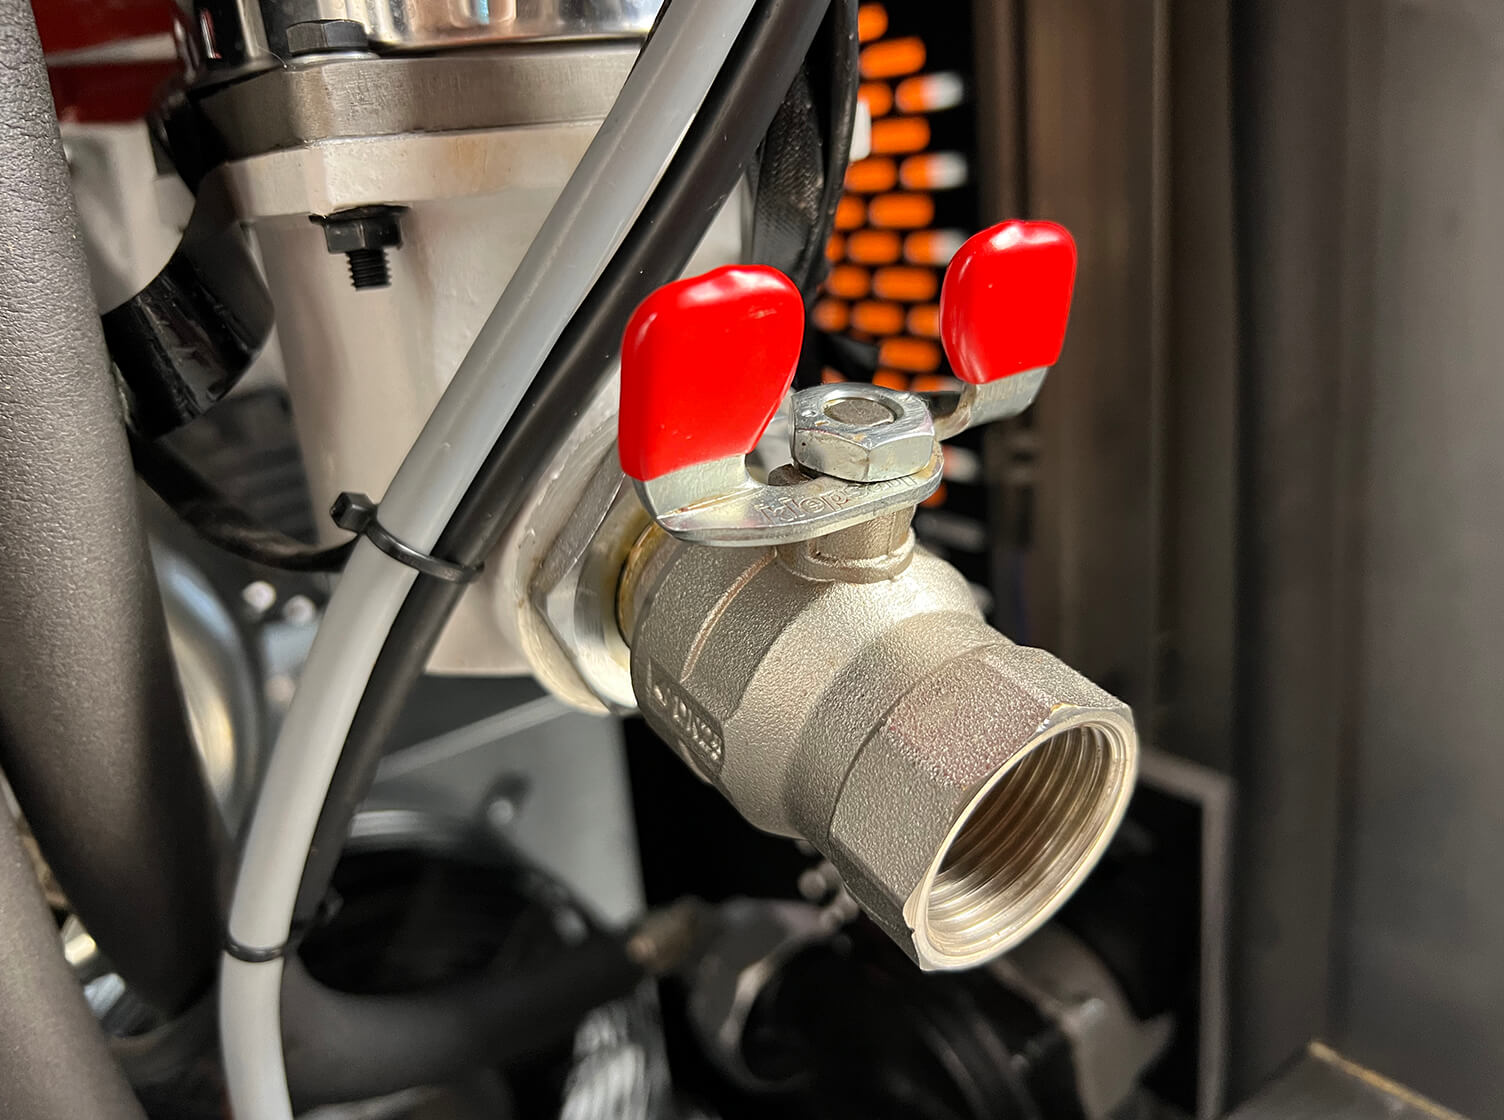
Supply column drain valve helps clean the ATM better. And this refers not only to the general washing of the machine. When switching from dark to white chocolate, a very thorough machine washing is required, especially for the auger column. If it’s impossible to drain the chocolate from the column, then this significantly complicates the maintenance of the machine.

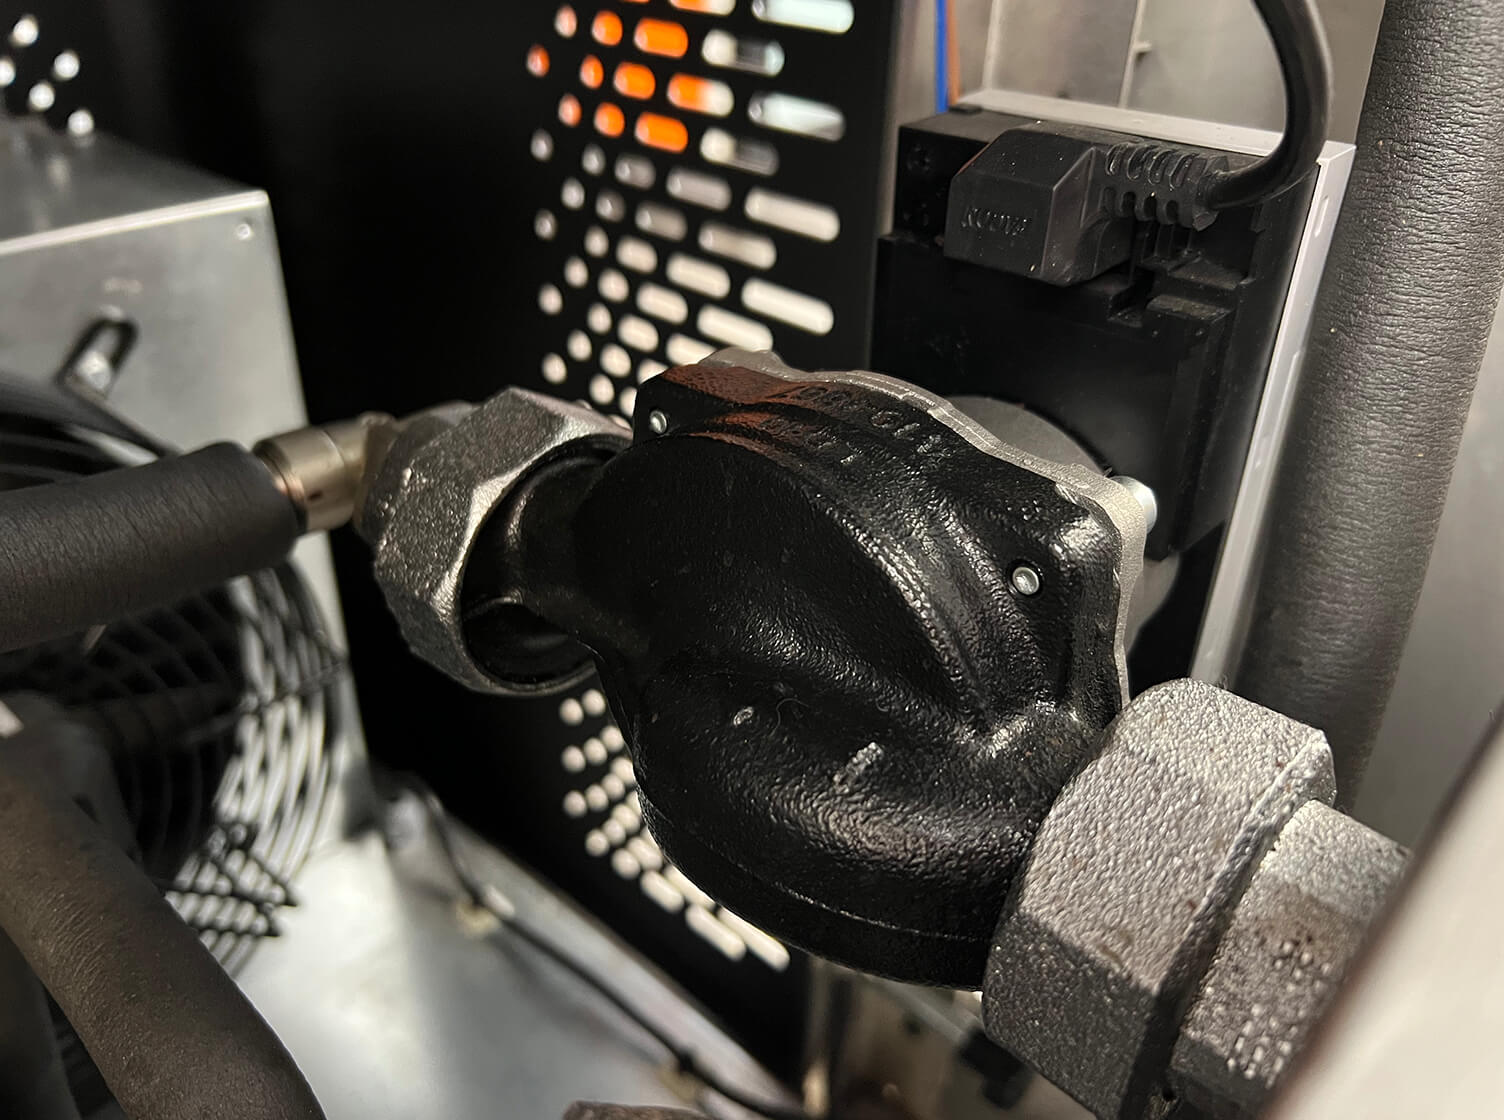
If the ATM is water-cooled, then you should pay attention to how the pump is located. The horizontal arrangement of the pump prolongs its service life, because the load on the bearings is reduced. Horizontal is better, vertical is worse. Such an unobvious advice.

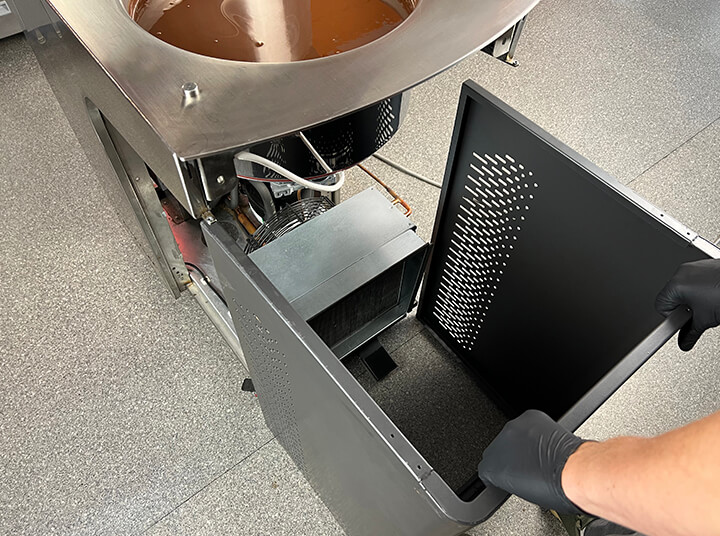
To fully service the tempering machine, it is necessary to remove dust and dirt from the cooling radiator about once a quarter. To do this you need to dismantle the front panel, since it cannot be reached from behind. Again, make a choice in favor of fewer screws and the ability to use a regular screwdriver. But better than any classic small screws can only be large wing nuts, which are unscrewed and tightened by hand without tools (and you won’t have to guess where they come from when you assemble the machine back).
There are machines that require the removal of the side and front walls in order to get to the radiator. So it’s necessary to unscrew (and then screw back) all three walls separately. There are machines that have all three walls combined into one panel, which is much easier to remove. Pay attention to this.
To fix the material, let’s go over the main parameters once again:
- Fancy look is not always cool. It’s better to have more flat surfaces so you can conveniently place inventory the way you want;
- The fewer screws, the better. Choose a machine where the screws can be either unscrewed with a regular Phillips screwdriver or special latches / wing nuts are used;
- It’s better when the machine control panel is located on top, above the drain spout. It’s great when all the machine functions are displayed on one panel;
- Drain spout, pedal and auger must be metal;
- The closer the spout temperature sensor to the outlet (where the chocolate is poured from), the better. It’s great if the tip of the spout is adapted for connecting various equipment via a standard camlock type mount;
- It’s nice when the vibrating table comes with the machine. The larger it is — the more handy it is. Pay attention to the heating of metal bars and a scraper;
- The larger the volume and diameter of the melting tank — the better;
- Wheels are good. If the wheels are adjustable in height and can be replaced with others — even better;
- A fancy motherboard with unique details is not always good. The simpler the board — the better. Availability of universally available spare parts will speed up and reduce the cost of maintenance in case if something burns out;
- The self-diagnosis function simplifies communication between you and the service center and, as a result, speeds up problem solving;
- The more ergonomic and freer the internal nodes are placed, the easier it is to clean them;
- Чем эргономичнее и свободнее размещены внутренние узлы — тем проще их чистить;
- Water cooling is better than simple copper capillary tube;
- A drain valve of auger’s column will help to clean up the ATM faster.
Also here is a checklist with all the points listed. You can download it, print and make some notes while choosing an ATM.
If you liked the machine on the base of which this material was written, then you need to jump over here.
Checklist for choosing an automatic chocolate tempering machine
 Just a moment...